How to Keep Costs Down with Low Volume Production Machining
- Posted By: Zach Schantz
The biggest hurdle when it comes to low-volume production machining is the per-unit cost. This is especially true for one-off parts or prototypes.
There are instances where low cost just isn’t a viable option because the design calls for a complicated part with many setups and advanced programming. Another common problem can be a poorly designed part. But there are ways to keep your costs down and allow for lower per-unit costs and more reasonable prices across the board; in this article, we will talk about ideas that are easy for you to implement and save some money.
This just isn’t a luxury you have in low-volume manufacturing. You must deal with all the upfront headaches without the luxury of spreading those costs across many parts.
Is Low Volume Production Machining Right for Me?
Tips for Keeping Low Volume
Production Machining Costs Down
With that said, there are some options you have. If you incorporate some or all these tips, you’ll enjoy lower prices per unit on your low-volume parts run. Many of these tips play into the points we discussed earlier.
A Good 3D Model will Help Your Machinist
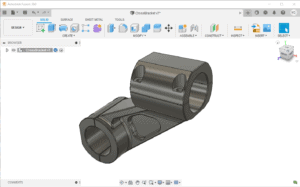
If your designer can provide a good 3D model, you’re off to a great start. Good designers understand a little about machining and how it affects their modeling technique. For instance, taller walls on the part need to be kept as thick as possible to minimize tool chatter. Tool chatter begins as a vibration that intensifies and destroys all hope of a smooth surface finish. To help save surface finish on the part, the machinist will need to slow way down, leading to longer run times.
Solid Models with Clear Prints
Can Reduce Confusion and Costs
Miscommunication and confusion will hike up the price of your low-volume production machining job. The best way to clear things up is with a clear, easy-to-read, finished set of prints. Machinists like to have prints to call out things like thread details and critical tolerances. These things are not always perfectly clear on a solid model.
In an ideal world, an engineer would deliver a solid model file along with a part print. This gives the machine shop programmers everything they need to properly prepare the part for manufacturing. This step alone can greatly reduce confusion, and ultimately, the finished part cost.
Larger Inside Radii Can Reduce
Machine Time, Cost & Improve Quality
Requiring 90-degree internal corners is an expensive ask. In most cases, it simply can’t be done; cutting tools are round, so sharp inside corners are more often than not impossible.
In many cases, the designer can allow for internal radiuses to cut down on manufacturing time and reduce the overall cost. Unless absolutely required, a part should always be engineered with rounded internal features and corners. The deeper the internal pocket, the larger the radius required. This allows the machinist to reach down to the bottom of your part with a larger diameter tool. Larger tools are more rigid and reduce the chances of chatter, which causes a poor surface finish.
There is a simpler way to think about this: if you are out driving in your car, you really must slow down and almost stop to make a sharp 90-degree turn. If the turn is much bigger or requires a bigger radius, you can keep your speed up. The same is true in machining.
Looser Part Tolerances Lead to Faster Machine Times
The more figures after a decimal point on a print, the higher the manufacturing cost. Many designers will default to tolerances that are tighter than required. The price difference between hitting +/- 10 thousand and +/- 2 can be dramatic. High precision parts require more final cutting passes to bring the part up to tolerance and extra quality assessment steps, ultimately slowing the entire process down.
Whenever possible, a part should be designed with the loosest tolerances possible. This allows for quicker manufacturing and a lower price tag. To help put things into perspective, the average human hair is about .003”, or three-thousandths of an inch. Rarely do parts really need to be that accurate, and if they do, it’s often certain features that need to be tighter as opposed to the full part.
Be Mindful of Diameter to Depth Ratio
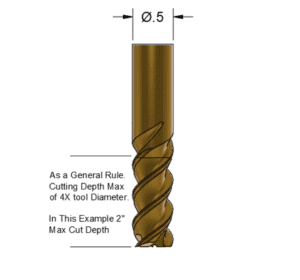
As we touched on with sharp internal corners, a small radius depth of cut can also be next to impossible. Any tool required to reach much more than 4 times its diameter is usually asking for trouble.
For example, if you had a 1” deep pocket and you modeled the part with a .125” inside radius, you could very likely run into a problem. If you were to open the radius to say .25”, the machine shop could use a ½” diameter tool, which is much stronger. The stronger the tool, the faster the machine can run with a better surface finish.
As a general rule, using the above example, the machine could run almost twice as fast, shaving in many cases several minutes off of each part.
Schantz Machine and Fabrication Specializes in Low Volume Production Machining
Low-volume production machining can be an expensive process without careful consideration, but with the right mechanical design and setup, you can help reduce the overall cost. Using these tips should reduce your per-unit cost dramatically and save you a lot of headaches and money. Give SMF a call to discuss your low-volume production machining needs.
Other Articles of Interest
Titanium vs Steel Choice
Titanium vs Steel: Whats the Better Choice? In the manufacturing world and the machining industry, titanium and steel are the top choices when it comes
Top Challenges to Consider When Machining Titanium
Top Challenges to Consider when Machining Titanium Titanium’s high strength, high corrosion resistance, low weight, and other distinctive characteristics make it a material that is
What is Turning CNC Turning Milling for Custom Machining
What is Turning? CNC Turning & Milling for Custom Machining CNC machining encompasses several processes, the outcomes of which can include tools, parts, or components
How Can We Help You Today?
From initial design, to prototypes and full production,
you can count on us to deliver quality parts,
on time and on budget!
